Saturday, 29 May 2010

References & Bibliography

Bateman, C and Boon, R, (2006), 21st Century game design, Massachusetts, Charles River Media

Hartas, L, (2005), The Art of Game Characters, East Sussex, ILEX

Irish, D, (2005), The Game Producers Handbook, Massachusetts, Thomson

Anzovin, S and Anzovin R, (2005), 3D Toons, Cambridge, ILEX

Gahan, A, (2009), Game Art Complete, Oxford, Focal Press

Kelly, D, (1998), Character Animation In Depth, New York, Coriolis

Cabrera, C, (2008), An Essential Introduction to Maya Character Rigging with DVD, New York, Focal

Dwelly B et al, (2003), Learning Maya 6: Character Rigging and Animation, Canada, Alias

Clark, B et al, (2007), Inspired 3D Advanced Rigging and Deformations, Michigan, Thomson Course Technology

Olivero, G, (2006), Maya 8 Character Modeling, Oxford, Wordware Publishing, Inc.,

Final touches

I had finished my modelling and animation and set the lighting for the scene but I still wanted to add something to the look as I thought the scene was still quite bland. So I decided to use After Effects to finish the project and give it it’s final look.

I used the Fog 3D effects over a number of layers as I didn’t want the fog to move all in one layer but rather independently.The first layer I added a glow effect to near the door so it would look like the fog was reacting to the light. I then created two more fog layers, one for the foreground and one for the background.

fog Fog layers

As they were separate layers I could animate and light them separately.I adjust the rotation and transformation of the fog layers so it would be slow mist-like movement and I adjusted the foreground fog layer to react to the pod door when it swung open and shut. I didn’t quite achieve the effect I wanted with this as I wanted the fog reaction to resemble a ‘swirl’ but I couldn’t find a way of doing this.

aftereffectspod Final pod with composite fog effects

Once my fog layers were animated in as best a way as I could get them, I decided my last ‘tweak’ would be the addition of sound effects. Originally I just wanted a fly buzzing noise which ended when the door hit it, but as is often the case I got overly ambitious and decided to have some more sound effects in there such as the actual The Fly’ theme music and the splat and glass squeak sounds.

These sounds took a lot of adjusting and changing until they hit the right time sections but eventually I got it as best I could and finally the project was complete within the timeframe and within the polycount.

Conclusion:

Of all the FGA projects so far this has been the most challenging for me, primarily because I find Maya a quite difficult programme to use. The process was complex and at times frustrating particularly when I had to rebuild my model from scratch due to the massive polycount. However once I had relearned Maya’s basics I was surprised at how quickly my project came along and although I had several glitches along the way I am pleased at my final work.

Tuesday, 25 May 2010

Lights, Camera, Action

In last weeks tutorial we were taught how to use the different lighting settings in Maya. Depending on the type of lighting option used these can greatly change the look and feel of your scene. Neuberger (2005) explains that although lighting the scene is the last step in the 3D process, it is also one of the most important as it can create a very specific mood that the artist is looking for that would not be obtained in any other way (P131).

There are several types of light including:

Ambient – Which is light form all around.

Point light – Which is a light which emanates from a point specified by the user.

Spot light: Which, as it sounds, creates a light behaving like a spotlight in the scene which the user can define and control.

Directional Light: Which is a even light which comes unidirectionally, usually acting as ‘the sun’ in the scene.

lights

All of these can be used on their own or together to create specific effects, of course these can be tweaked in a lot of different ways such as the rate of the ‘decay’, the colour and the strength of the light.

For my scene I wanted to have a point light emanating from inside the Pod and two directional lights: One to illuminate the pod from the front and one from the back. The point light, I tinted a green to match the look I wanted and it added a lot of extra depth to the ‘glow’ from inside the pod.

noshadowpod

The reason I added the light at the back is that that soon after I created the ‘feel’ I wanted I decided that I wanted the pod to cast some long shadows at the front, adding to the mood. The picture below, shows the pod with the shadows added.

shadowpod

Sunday, 16 May 2010

The Fly III: Revenge of the rig


In last weeks tutorial we were taught to work with a single polygon primitive and create a model from that using tools such as extruding, splitting and tapering. Although this technique took a while to get the hang of it would make my telepod model a lot easier to work with if it was one object rather than comprised of as many as it was, it would also greatly reduce the polycount as even though I had removed quite a few polys there was still a larger amount than we were allowed.

extrude


Although I didn’t want to create the entire animation again, I could redesign the pod for the large part with just a single object and just extrude the rings. Obviously I would still have to keep the fly, door, dial etc as separate objects as they would need to animate independently.

My asset had little use for a rigging or UV mapping but I at least wanted to show what could have been done with a larger fly rig and also to show that I understood the basic mechanics of rigging so I recreated the fly starting as simple object and then extruded to get the shape I wanted, I then added a simple rig (IK legs/wings were not needed as the fly would not be grounded during the animation). The rig worked well but as I had detailed and animated so much of my own fly model I decided to keep my original.

Once the main body of my telepod had been remade using a single object, I started to work on perfecting the materials to give the scene a better look, more resembling the telepod in the film as best I could. I found several ways to create a better effect, first I added a green/blue glow to the door and a red glow for the light on the door dial. I then added the green/blue glow to the viewing port on the side. Once I had a look I was happy with I added a green tint to the reflected colour of the main telepod. I used the reference images below to help me with the model...


I also used the hypershade and material settings to adjust the look of the fly itself; changing the wings to a rippled transparent look and the eyes to a blueish purple shine.

Fly with default materials

Fly with new materials 

Return of The Fly

Although I had decided on the hamster idea as my final game-ready asset involving the sphere, I decided to finish it off and make it as an animation just in case my hamster idea wouldn’t be game-ready in time.

The animated model at my first attempt had far higher than the allowed number of polygons so I had to remove as many faces/plans as I could without detracting from the model. As my original model was made as a solid model, there was a chance that removing the planes/faces I needed to make the ‘pod’ hollow would greatly decrease the number of polygons. Therefore I removed as many planes as I could without deforming the shape and concentrated on where the camera would not be shown too much such as the inside, underneath and back of the pod.

I decided to incorporate a simple animated fly into the scene, using parenting hierarchy and materials as we had been shown. The fly would fly around the pod erratically scene and be hit by the door of the telepod as per the storyboard below…

scan0001

The animation took a large amount of time to do as I had to animate each wing-beat on each wing on every frame to male it look like the wings were beating quickly. The pod itself was simple to animate as it was mainly a solid non-moving object and only the door dial and the door would move in the animation. There were things that I wanted to incorporate into the animation such as the legs on the fly moving as the fly changes direction but due to the size of the fly the legs would barely be seen and therefore putting that amount of detail into them would be moot.

While I was working on the animation, I was pleased with how it was turning out and as it looked a lot more interesting I decided to make it my final game-ready asset instead of the hamster. I wouldn’t include the person going inside as I first envisioned as it would be far too time consuming but just keep the fly idea and refine my model.

Monday, 10 May 2010

Hamsters

For reference for my own hamster sphere idea I began collecting images and short Youtube videos showing hamsters and hamster balls (Reference sheet below). These helped me to see how a hamster in a hamster ball actually moves. With these I began to structure my own Maya hamster just using Polygon primitive spheres and trying not to worry about the topology at this stage.

Photo references                                       Reference photos

                                     Reference video

Making and creating the simple animation was not hard, there was a few things that I wanted to include in the animation but after learning that I would be unable to move the location of an object (or group’s) pivot I realised this was impossible. I came across the problem earlier when I tried to animate a simple waking gorilla made out of polygon primitives and I wanted to move the pivot point during the animation. Once the object/group was moved it would still rotate around the previous pivot point causing all the objects to disassociate.

With reference from the below photo I also began to construct a simplified hamster skeleton using Maya's 'bones'. I will add IK foot locks, ‘skin’ and animation to this at a later stage but it was helpful just to construct the skeleton and see how it would eventually move, from which joints and from which centres of gravity.

Hopefully this would be of great use in my final game-ready asset.

skeletons

Sunday, 9 May 2010

One destination: Too many routes

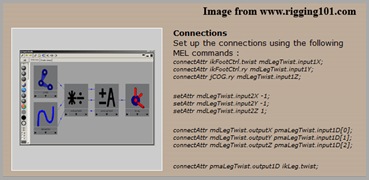
After another lesson in rigging showing us the essentials of inverse kinematic locks, I decided to read more as I found the technicalities quite hard to master so I looked back at my reference books such as Learning Maya 6: Character Rigging and Animation and Maya character animation. I also went back to rewatch the tutorial videos. I soon realised a problem; although they all promised the same end result i.e an inverse kinematic leg or a simple animated biped, almost every book or tutorial video I looked at had a different way of achieving it. Each source had a different method. For instance 'Rigging101.com' promoted the use of cube controllers and MEL commands, while most of the book and other tutorial videos didn't even mention MEL commands and I hadn't even encountered them before in Maya, let alone for this system.

                                  rigging101
                                  Example of the confusing MEL commands on rigging101.com

This was a common problem not just for the rigging in Maya but for many of the systems, it seemed that there was 101 ways to skin a cg cat. One book would preach the ease of one system and one set of tools and another would preach an entirely different one. I found the only way around this was to try both and see which way worked best for me, it was a slow way to work as it meant trying a lot of variables but it did mean that I could find one that I was comfortable with using.

This was in effect most likely because there are a number of ways of doing the same thing in Maya, the toolbars can repeat what is on shortkeys on the keyboard etc so it’s understandable that people would find their own ways.

Tuesday, 4 May 2010

The Mire of Maya

Today's tutorial with Gideon taught us the finer details of polygonal modelling in Maya techniques such as merging vertices, extruding and others made modelling a lot simpler. Although we've yet to learn about 'skinning' and merging objects to bones it does help to know these tools to make my model more defined and the animation go smoother.

I have decided to focus on the hamster in a ball for my sphere idea, although the 'Fly pod' looked great rendered and painted as I previously thought, adding animation to it how I wanted it to be would just be far too complex and time consuming and considering our time constraint it just wasn't possible.

I have began to color my models by experimenting using assigning new materials and altering the color, transparent etc. I've mainly experimented using my practice animations and low polygon models just to see what I can do and learn how to perfect these techniques before I apply them to my main hamster ball animation. Experimenting with the tools encompassed within the materials I've found there is a great scope of what effects I can achieve, especially using the greatly variable 'checker' tool which I think will be of great use when it comes to modelling the actual hamster-ball itself as it will enable me to create the grid effect of the hamster balls.

Wednesday, 28 April 2010

All hail the sphere

Now we've been given our design brief and it's an interesting one. Our point of reference and of inspiration is http://www.cgsphere.com/. There are a lot of excellent idea on there which only seem to be limited by the artists imagination, unfortunately mine would need to be limited by my skills as unlike many of the submissions on cgsphere, my sphere would need to be animated. Hopefully though this would be a boon rather than a handicap.

I came up with a number of sphere-centric ideas...

1) Telepods as seen in the 1986 movie 'The Fly'
2) Tadpole in jelly egg.
3) Franken-sphere
4) Chimera sphere- with two animals becoming a sphere-like splice
5) Alien invasion of earth
6) Circus bear/elephant on a ball
7) Hedgehog going into a ball
8) HG Well's' Time machine a la the George Pal version
9) Hamster ball

Some of these ideas I liked visually as they would look very imaginative but would unfortunately show very little in terms of rigging/animation such as the Franken-sphere, the tadpole and the alien invasion of earth and since this was a task set to show our rigging and animation skills and not how creative we could be, those ideas were put on the scrap pile. Other ideas would show some animation but not a lot of rigging, such as the Time Machine so this was put on the scrap pile as well and I focussed on the ones I had remaining. That left...

Telepods from 'The Fly'
Hedgehog
Circus bear/elephant on a ball
Hamster ball

The Telepods would be a great animation but would be complicated to rig and animate, I would need four animated components:  The Pod, a person, the fly and the 'Brundlefly'. This would be arduous and a lot more technical and time-consuming but it would look excellent if I could achieve it.

The hedgehog would be a simple (I think) process to achieve but may not show enough in terms of rigging and animating.

The circus bear/elephant on a ball would be less complicated and would look great as would the Hamster ball, though the Hamster ball would have an aspect which as yet I was not sure how (if at all) I could achieve and that was transparency.

For practice I began work on creating simple models in Maya of the ideas to help me visualize and to see how complex they would really be...
                              
fly-pod
telepod
                     Maya Telepod                                          The Fly telepod

Tuesday, 27 April 2010

Dem bones

We’ve now been introduced to the concept of ‘bones in Maya, which I have to admit is more complex than I thought it would be. To help me understand it I’ve rewatched the video-tutorials on the subject that I mentioned in my last post. There are also various other bones video/pictorial tutorials on the internet such this one… Maya bones tutorial

Maya Bones...

The main issues with bones seems to be with regards to the orientation of the axis which links back to my blog post from my last module on 3D modelling, regarding 3-dimensional space representation using X, Y and Z axis. Link to previous blog post. This was a lesson I was thankful I had learned as it was in use quite a lot in 3D animation.
             
I’ve started to experiment with bones in Maya but I’m still unsure how to link this to my animation. For instance if the bones are added to a complete modelled Maya animation will they effect the movement? Are they visible throughout the process? Do they need to be animated independently? I will have to wait until our next lecture to find out as I don’t want to jump too far ahead with the video tutorials in case I’m learning extraneous information.

Monday, 26 April 2010

Confusion, thy name is Maya

In retrospect I should have 'kept my hand in' with Maya, as I hadn't really used it since our animation assignment and in truth was happy to leave it behind and now picking it back up again and incorporating the new information and facets of Maya is proving troublesome. I've been spending as much time as I can on Maya, relearning the ropes and getting to grips with the hierarchy that we have been taught.

In truth, learning hierarchy was not as difficult as I thought it might be, this is probably because hierarchy itself is quite intuitive and learning the order of parenting especially with humanoid models is as simple as thinking about which order my own body obeys the rules of the skeletal structure for instance the wrist having the least rotational and smaller joints having less rotation and having to move in relation to when and how the larger connected joints move. I researched forward kinematics and inverse kinematics, specifically inverse kinematics since this is what we would be using in Maya. Forward kinematics means that the in order for the model to move, the parent joint moves first, then the next ‘child’ down the hierarchy and then the next child.

Example of forward kinematics below...

kine


Fortunately the type of modelling and animating we would be doing allowed for inverse kinematics once we had got the hang of the basics. According to Kuperberg et al (2002) inverse kinematics more closely mimics how the body moves but can be far more complex to rig and animate (2002:103). Using IK animation means that if for instance a leg was animated then all that would be needed to move the leg from point a to point be is to move the foot and the rest of the leg would follow.

With all the above in mind I tried some simple animations in Maya, just using small, easy-to-animate forms such as my MayaBirds animation which can be viewed in my folders.

                                          Maya birds screenshot

Friday, 23 April 2010

Hitting the books...

Received our brief and as always, my first stop was the library (NUCA and public) to pick up some research books.

Being as the large majority of the FGA was being done in Maya, I focused my book search on Maya and Maya character animation.

I found the following books...

Game Art Complete - Andrew Cahan: This book mainly dealt with subdivision modelling but did have some information on rigging and animating in Maya.
3D Toons  - Steve and Raf Ansovin: Although this book also had little in the way of rigging, it did have a lot of information on character animation and movement which I think will be helpful when creating my short animation in Maya.
Learning Maya: Character Rigging and Animation -- Dwelly et al: Though since the book was written (2003) Maya has come a long way and is now a lot more intuitive, the books basics remain relevant and I was able to transpose a lot of the books teaching to Maya 2010 without a problem.
Character Animation -- Doug Kelly: This was another book that dealt mainly with character creation and polygonal modelling with very little information on Maya.
The Art of Game Characters -- Leo Hartas: Although devoid of any information on rigging, this book was useful to see how character are designed and which type would work best in my simple animation.

I also hit the forums again, which I've found to be invaluable as they can connect you with experts. On CGTalk http://www.cgtalk.com/ I placed a post requesting recommendations for the best rigging books/websites. On their advice I picked up two DVD's on Maya character rigging which were Gnomon's 'Character Rigging' and 'Animator Friendly Rigging' by Digital-Tutors. These DVD's were excellent as although they repeated a lot of what we had been shown already in the tutorials, they provided refreshers and simple tasks which helped me get to grips with Maya again.